“Wild is about Nature going about its own business without much human intervention.” Poet and Environmentalist Gary Snyder
Besides my Grandmother who taught me how to forage wild plants such as lambs quarters (also known as goosefoot or pig weed), wild asparagus, purslane, huckleberries, and to catch trout with my hands, there are two notable wild foragers and their books who furthered my education: Billy Joe Tatum’s book Billy Joe Tatum’s Wild Foods Field Guide and Cookbook, and Euell Gibbon’s three books: Stalking the Wild Asparagus, Stalking the Blue-Eyed Scallop and Stalking the Healthful Herbs. One other book that has been a very useful resource for me over the years is the L. L. Bean Game & Fish Cookbook by Angus Cameron and Judith Jones. The books by Samuel Thayer The Forager’s Harvest and Nature’s Garden should also be part of your library since they do such a good job of describing wild edible plants.
Our prehistoric ancestors picked and gathered wild plants that were, in many ways, far more healthful than the stuff we buy today at farmers’ markets. This isn’t the result of the much-bemoaned modern, industrial food system. It has been thousands of years in the making ever since humans first took up farming (some 12,000 years ago, more or less) and decided to cultivate the wild plants that were the most pleasurable to eat. More pleasurable generally meant less bitter and higher in sugar, starch or oil.
We looked around at all these wild plants that we had been eating for millennia and we kind of said to each other, “We’re getting tired of eating this bitter, chewy, fibrous, low-sugar food.”
Over the centuries those choices in human agriculture led to a dramatic loss in the nutrient value of the plants we eat most commonly — something we had no way of knowing until recently, when modern technology made it possible to do so.
I’m not arguing that we should all go back to foraging for our dinner. Rather, we should learn about the history of the foods we eat and, as Wendell Berry said, “learn as much as we can by direct observation and experience, if pos¬sible, the life histories of the food species. Many people are now as much estranged from the lives of domestic plants and animals (except for flowers and dogs and cats) as they are from the lives of the wild ones. This is regrettable, for these creatures are in diverse ways attractive; there is much pleasure in knowing them.”
The specter of global warming and how it is dramatically changing the landscape coupled with agricultural practices that place a premium on volume through practices such as mono-cropping has also brought to our attention the need to identify and preserve wild foods. The biodiversity represented in wild foods means they contain genetics and other properties that can help us maintain our food supply and feed our rapidly growing population. Michael Pollan’s cautionary tale of potatoes in The Botany of Desire is a good example. In Ireland in the 1840s, a blight attacked the potato crop causing the death of over one million people. Potatoes were the main food crop at that time and were the result of using a single potato variety called the Irish Lumper. Well suited for Ireland’s poor soggy soil, it was not disease resistant. In contrast, potato varieties in the Andes where potatoes were first domesticated numbered in the thousands. Many varieties were grown at the same time, which enabled them to survive a wide range of environmental stresses and avoid catastrophic failure. Thanks to disease resistance found in the diverse Andean gene pool, potatoes in Ireland rebounded from this disaster.
Disclaimer: I hate to begin a book with a disclaimer, but it is necessary, so here goes:
To the best of our knowledge, the information contained herein is accurate. I must stress, however, that you do not eat any wild edible plants, herbs, weeds, trees or bushes until you have verified with your health professional that they are safe for you.
DANDELIONS
The dandelion (Taraxacum officinale) is probably the most recognized plant in North America. Dandelion gets its name from the French “dent de lion” or lion’s tooth, because of the saw-toothed edges of dandelion leaves. Early settlers looked forward to dandelions because they were usually the first greens of spring, and because they provide a useful tonic for the digestive system and the liver. My grandmother ate all parts of the dandelion for her rheumatism. The milky sap of a mature plant is believed to be useful for treating warts.
The big complaint about dandelion greens is that they are very bitter. However, as we have learned to enjoy bitter greens in North America, their place on our table has grown. Usually, I wouldn’t sit down and eat a big bowl of dandelion greens by themselves, but mixed in with other greens in salads and stir fries, and they can really shine. Dandelions are popular around the world, and there are hundreds of traditional dishes that utilize them so there must be something good about them. Despised by gardeners, the dandelion’s incredible health benefits should encourage you to try them occasionally. All parts of the dandelion are edible, including the flowers and roots. Leaves are best in early spring when they aren’t so bitter. Roots, once they are thoroughly washed, can be chopped and steamed or stir fried, and also can be roasted to make an interesting non-caffeinated coffee substitute. Flowers are used to make wine, and are pretty added to salads as is.
Here is a challenge for you: Go out and find a dandelion leaf. Then rinse it well, take a bite, and pay attention to what happens. For the first 10 seconds, you won’t sense much at all, except you’ll notice that the leaf is hairy, dense and chewy. Then, the semsation of bitterness appears at the roof of your mouth and then moves down your throat. It’s going to stay there for about 10 minutes. Many of the wild plants that we eat have levels of bitterness similar to that of the dandelion. Compared to spinach, which we consider a super food, a dandelion has twice as much calcium, and three times as much vitamin A, five times more vitamins K and E, and eight times more antioxidants.
Creamed Dandelion Greens
Serves 4 to 6, as a side dish
12 ounces tender dandelion greens
1 tablespoon olive oil
2 tablespoons butter
1/2 cup cleaned and chopped leeks
1 teaspoon finely chopped garlic
3 tablespoons dry white vermouth
2/3 cup heavy cream
1/4 cup freshly grated Parmesan
Clean and wash the dandelion greens, removing tough stems if necessary. Add the olive oil to a skillet over medium heat, and sauté the dandelion greens until just wilted. Sauté in batches if you need to with a little more oil. Remove from pan, let cool and roughly chop the greens.
Add butter to the pan and over moderate heat, add the leeks. Sauté until soft and translucent but not browned, about 5 minutes. Add the garlic and cook for another minute or two. Add the vermouth and cook until it’s nearly evaporated. Add the cream, salt and pepper to taste, and let simmer until it thickens, about 3 minutes. Stir in the dandelions and Parmesan, and heat through. Serve hot.
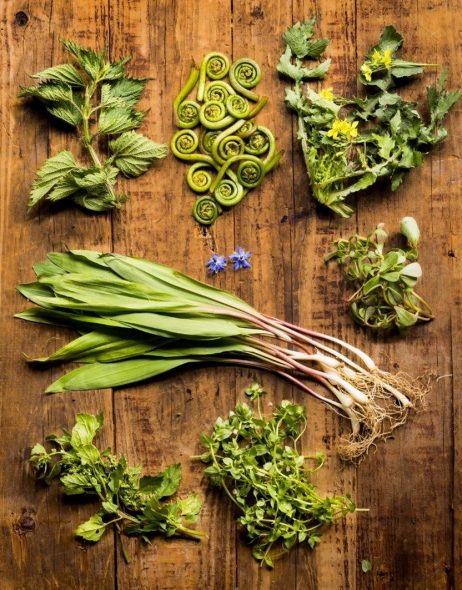
FIDDLEHEAD FERNS
Fiddleheads are an early spring delicacy with a very short season. Resembling the curved head of a violin, fiddleheads are the young coiled fronds of the ostrich fern (Matteuccia struthiopteris). Nearly all ferns have fiddleheads, but those of the ostrich fern are unlike any other. Ostrich fern fiddleheads, which are about one inch in diameter, can be identified by the brown papery scale-like covering on the uncoiled fern, as well as the smooth fern stem, and the deep ”U”-shaped groove on the inside of the fern stem. Before harvesting in the wild, make sure you can properly differentiate the ostrich fern fiddleheads from other fern fiddleheads.
Not all ferns are edible; in fact, bracken ferns are reportedly carcinogenic and should not be consumed. Look for ostrich ferns emerging in clusters of about three to twelve fiddleheads each on the banks of rivers, streams, and brooks starting in late March thru June depending on where you live. If the ferns are on private lands, always make sure that you have permission before harvesting. There are good YouTube videos on identifying and harvesting fiddleheads if you want to try yourself. Fiddleheads have an intriguing flavor that reminds one of the unusual combination of asparagus, artichokes and okra. Their distinct taste and firm texture make fiddleheads a good match for stir-fries as well as for cheese and tomato sauces.
Cooking fiddleheads
Clean the fiddleheads in a tub of clean water, rubbing them gently to remove the brown papery covering. Fiddleheads should always be cooked before eating, and boiling or steaming is the best method. To boil: Bring lightly salted water in a pot to a rolling boil, and add the washed fiddleheads. The water should fully cover the fiddleheads when added. Bring the water back to a steady boil, and cook for 2 to 3 minutes. To steam: Using a steamer of your choice, steam them for 3 to 4 minutes.
I think fiddleheads are best served simply with olive oil or melted butter and a splash of lemon or vinegar. Their flavor is reminiscent of asparagus so flavor them similarly. Cooked and then chilled, fiddleheads make a wonderful addition to salads. Fiddleheads should be boiled or steamed prior to use in recipes, which use further cooking methods like sautéing, stir-frying or baking. Remember to keep fiddleheads refrigerated until you are ready to cook or preserve them. They can be stored in the refrigerator for up to two weeks.
Sautéed Fiddlehead Ferns
Serves 4
1 pound fiddlehead ferns
Sea salt
2 tablespoons olive oil
1/2 cup finely diced pancetta
1 tablespoon butter
1 clove garlic, thinly sliced
Big pinch red pepper flakes
Drops of lemon juice
Trim and rinse the fiddleheads, removing any brown ends or mushy parts. In a deep pot, bring 3 quarts of water to a boil, add the sea salt so the water tastes like the sea, then add the fiddleheads. Cook for 2 minutes, then drain, rinse with cold water, and set aside. This blanching removes the bitter edge of fiddleheads.
In a large frying pan, heat the oil over medium heat. Add the pancetta, and cook until nicely browned and crispy. Remove and set aside.
Pour off all but 1 tablespoon of fat in the pan. Add the butter and garlic, and cook for 30 seconds for so or until the garlic softens. Add the fiddleheads and cook, stirring, until they start to brown, about 3 minutes. Add the red pepper flakes, reserved pancetta and season to your taste with salt, lemon juice, and more red pepper if desired.
LAMB’S QUARTERS
Also known as white goosefoot and pig weed, lamb’s quarters was one of the first plants I remember foraging for as a kid. The plant is part of the Chenopodium genus, and related to quinoa, beets and spinach. Lamb’s quarters has been described as a “super food,” high in Vitamins A, C, K, as well as riboflavin, calcium, manganese and potassium. The best known and most common is C. album. Lamb’s quarters are one of the really abundant weeds, and are found in every part of North America including desert and other arid locales. They are easy to identify. In addition to their “goose foot” shape, the plant has a distinctive white powder in the center of the new growth that will come off on your fingertips. The seeds have the ability to remain dormant for long periods of time waiting for a bit of moisture to quickly complete their life cycle. The flavor of the leaves is very much like spinach and can be used in any way that spinach is used. Tender leaves also make wonderful salad greens, and I think are great raw in sandwiches. One caution however is that lamb’s quarters (like many other leafy greens) can pick up heavy metals from the soil, so avoid harvesting them around sites that you think could be contaminated like construction sites or along busy highways. They grow so abundantly that you should have no trouble finding a clean site.
Lamb’s Quarters Frittata
Serves 4
6 large eggs
2 tablespoons cream or milk
1/4 cup freshly grated Parmesan or Asiago cheese
Salt and pepper to taste
1/2 cup diced cremini mushrooms
2 tablespoon butter
3 strips thick sliced bacon, finely chopped
1/2 cup green chopped green onions, both white and green parts
3 packed cups lamb’s quarters, tough stems removed
Turn the oven on to broil. Whisk together the eggs, cream, cheese, salt, and pepper in a medium bowl and set aside.
In an oven-safe 12-inch skillet (preferably non-stick), sauté the mushrooms with 1 tablespoon butter until all the moisture has evaporated, and the mushrooms are lightly browned. Set aside. Add the bacon to the pan with remaining butter, and sauté until nearly crisp. Add the green onions and sauté for one minute more.
Add the lamb’s quarters and cook until wilted, 2 minutes or so. Add the mushrooms and spread the contents evenly across the pan. Pour the egg mixture in and spread it across the pan with a spatula. Cook for a few minutes over moderate heat, gently stirring the mixture with your spatula until the egg mixture has begun to set. Stop stirring, and transfer the skillet to the oven and broil for 3 or 4 minutes until top is lightly browned. Serve warm or at room temperature.
Lamb’s Quarters Fritters
Makes 18 to 20 1-inch fritters serving 6
This is a recipe from Olivia Rathbone, the kitchen manager at the Occidental Arts and Ecology Center in west Sonoma County, California. She describes the fritter as “Seasoned like an Italian meatball. These fritters are quite versatile and can be made with any non-bitter wild green, such as amaranth. Serve as an appetizer by themselves or as a first course with a marinara dipping sauce.”
8 to 10 tightly packed cups lamb’s quarters, young shoots or plucked leaves
6-inch piece of stale baguette or 2 slices of country bread
2 tablespoons olive oil
1 cup finely grated Parmesan cheese
3 large eggs
3 cloves garlic, finely crushed through a garlic press
1/2 cup melted butter
2 teaspoon fresh oregano, finely chopped
1 teaspoon fresh sage, finely chopped
Pinch red chili flakes
Salt and pepper
Blanch the lamb’s quarters (or amaranth) in boiling water for 15 seconds and shock in an ice bath. Squeeze most of the water out. Chop finely and reserve. This should yield around 2 generous cups of cooked, chopped greens.
Slice or tear the bread into pieces, and spread onto a cookie sheet. Drizzle with olive oil and sprinkle with salt. Toast in a hot oven (400F) or toaster until they crisp up. Let cool. Pulverize in a food processor into fine breadcrumbs.
In a large bowl, mix together the chopped greens, breadcrumbs, melted butter, grated parmesan, eggs, crushed garlic, and seasonings. Shape the mixture with your hands into 1-inch balls or patties, and arrange on a cookie sheet.
At this point, the fritters can be frozen for later (freeze on the cookie sheet, then consolidate into a bag) or bake them to serve immediately. In a 350 oven, bake the fritters until golden brown, about 8 to 12 minutes for the fresh fritters and 15 to 20 minutes for the frozen fritters.
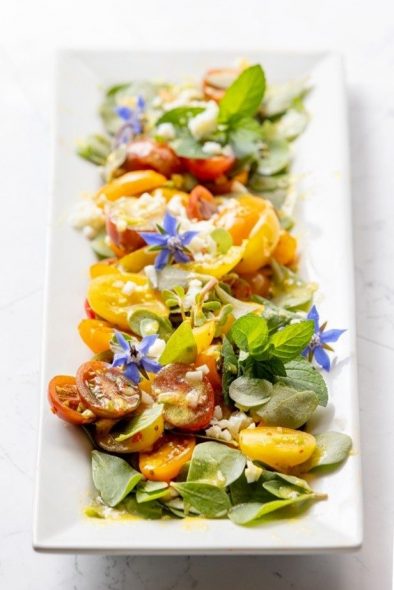
PURSLANE – THE DELICIOUS WEED
Although farmers and gardeners and the FDA usually see purslane (Portulaca oleracea) as an invasive weed, it’s a popular vegetable and herb in many cuisines, including those of China, Mexico and Greece. In Mexico, the plant is called verdolaga, and is a favorite comfort food. There, it is eaten in omelets, as a side dish, rolled in tortillas, added to salads, or dropped by handfuls into soups and stews.
Even if you don’t know the purslane name, I know you’ve seen it. Purslane is a low growing, spreading plant with succulent leaves that look a lot like a miniature jade plant. It grows just about everywhere and thrives in the warm to hot weather of late spring and summer. You can eat the entire plant: leaves, stems and tiny flowers. It has a tart, lemony flavor with juicy, almost mucilaginous texture. Look for it in sunny places with poor or disturbed soil, especially in parks and farmlands. Purslane is a very hardy plant and can even grow in cracks in the sidewalk or roadway. If you are wild gathering, be careful, of course, to avoid picking purslane around areas which are impacted by pesticides or automobile pollution. You’ll find cultivated versions in farmer’s markets during the spring and summer.
Worldwide, there are something like 19 genera and approximately 500 species of purslane. Part of the reason for its evolutionary success is that a single plant can produce more than 50,000 seeds, and those seeds can survive for up to 40 years.
Purslane was said to be Gandhi’s favorite food. According to Harold McGee, “Purslane is also called ‘pigweed’ owing to the fact that the 19th century Englishman William Cobbett said it was “suitable only for pigs and the French.” McGee also notes purslane’s tartness comes from an abundance of malic acid. Succulents like purslane convert malic acid to glucose during the day. This means purslane harvested in the morning will be tarter than purslane harvested later in the day or evening.
Purslane is very healthy for you. It has the highest amount of heart-healthy omega-3 fats of any edible plant, according to researchers at the University of Texas at San Antonio.
Fresh, raw leaves can be used in salads and as vegetable juice. Gently sautéed, steamed or stewed stems and leaves are great served as a side dish with fish and poultry. Also try it quickly stir-fried and mixed with other like-minded greens such as spinach and vegetables. Purslane is also used in soups and curries and eaten with rice.
Moroccan Tomato and Purslane Salad
Serves 4
You can buy prepared harissa, but it’s better if you make your own. It’s a potent condiment, so use with discretion.
3 tablespoons fresh lemon juice
1 teaspoon or so harissa, or to taste (recipe follows)
1 teaspoon honey, or to taste
12 ounces or so ripe cherry tomatoes, halved or quartered depending on size
1/4 cup finely chopped scallions, both white and green parts
1 cup purslane leaves
2 tablespoons chopped fresh mint
Kosher or sea salt to taste
Whisk the lemon juice, harissa and honey together, and gently combine with the tomatoes, scallions, purslane and mint. Season to taste with salt and additional harissa if desired. You can make this a few hours ahead and stored covered in the refrigerator.
Harissa
Makes about 1/2 cup
There are as many variations of the recipe for this Moroccan hot pepper condiment as there are people who make it. At its simplest, harissa is just hot dried chilies which are ground and stirred into olive oil. This version has some other flavors added to give a little more dimension. You could also add something tart like lemon, vinegar or sumac, and green herbs such as mint or cilantro.
2 cups (1 ounce or so) dried hot red chilies
2 teaspoons whole coriander seeds
1-1/2 teaspoons whole cumin seeds
2 tablespoons chopped fresh garlic
1 teaspoon Kosher or sea salt, or to taste
Extra virgin olive oil
Soak the chilies in warm water to cover until softened, about 1 hour. Drain and cut the chilies in half discarding the stems and seeds. Chop the chilies roughly and set aside.
While chilies are soaking, dry toast the coriander and cumin seeds in a small frying pan over moderate heat. They should be a shade darker and fragrant. Grind to a fine powder and set aside.
Add the prepared chilies, spices, garlic and salt to a blender. Purée, adding just enough olive oil to make help the mixture to purée, about 1/3 cup should do the trick. With the motor off, scrape down sides with a rubber spatula to make sure mixture is evenly puréed. Spoon into a clean jar and top with enough olive oil to completely cover. Store covered in the refrigerator for up to one week.
RAMPS
The ramp (Allium tricoccum), as it’s called in southern and central Appalachian Mountains, is also known as wild leek in the northern part of its range. Ramps are found on the east coast, from Georgia all the way up to Nova Scotia and New Brunswick, and west to Missouri and Iowa. Festivals honoring ramps are held in many parts of the south and Canada, especially Quebec.
Ramps appear early in the spring for only a few weeks, and most of their growth appears before the leaves of nearby canopy trees are formed. They typically grow in large clumps, which might be several decades old. Because ramps are relatively slow to reproduce, they are susceptible to overharvest. Always be sure to leave a good part of the clump behind for future generations if you gather them.
Ramps are part of the Allium family, which includes onions, garlic, chives, shallots and the like. Cut into one and you’ll understand its family connections. The strong flavor and odor of ramps is like a combination of onions and garlic, especially the latter. Even ramp-lovers will advise caution in eating them. After a big meal of ramps, you might find people keeping their distance.
Ramps are a very recognizable plant that resembles a scallion with beautiful, broad flat leaves that set it apart from everything else on the forest floor.
Cautions aside, ramps add wonderful and uniquely pungent flavor to soups, egg dishes, casseroles, rice and potato dishes. Use them raw or cooked in any recipe calling for scallions or leeks. Since ramps aren’t cultivated in the way leeks are, they’re much easier to clean. Just cut off the roots, rinse thoroughly, and scrub off any excess dirt on the bulbs. Ramps aren’t available for long, but you can chop and freeze them for cooked dishes. The green tops are milder in flavor and are usually used along with the bulbs.
Grilled Ramps with Romesco
Serves 4
This recipe is based on the Catalonian festival called calçotada, which features the harvest of a variety of green onion known as calçot. They are grilled until smoky and darkly browned and served in big heaps with salsa romesco. If you have a grill basket, this is a great time to use it. If not, lay the ramps perpendicular to the grill grates so they don’t slip through.
12 ounces cleaned ramps
Olive oil
Sea Salt and freshly ground pepper
Romesco Sauce (recipe follows)
Prepare an outdoor grill on medium-high heat. Toss the ramps (including greens) with olive oil and season well with salt and pepper. Grill, tossing often, until the leaves and bulbs are lightly charred, about 4 minutes. Serve with romesco on the side to dip the grilled ramps in. Have napkins at the ready.
Romesco sauce
Makes about 2 cups
1 large red bell pepper
6 ripe plum tomatoes
1 head garlic, halved, papery outer skin removed
1 medium Spanish (red) onion, peeled and halved
5 tablespoons fragrant olive oil plus more for coating the vegetables
6 nora or cascabel chilies or 2 medium ancho chilies
1/4 cup blanched almonds
1 ounce white bread, crusts removed
1 tablespoon sherry vinegar
1 teaspoon pimenton (Spanish sweet paprika)
Salt to taste
Brush the pepper, tomatoes, garlic and onion with a light coating of oil. Place on a hot grill and cook until vegetables have softened and are nicely marked. While vegetables are cooking, place the chilies in a bowl and cover with hot water. Soak for 15 minutes. Strain and remove the seeds and stems. Set aside.
Heat 1 tablespoon of olive oil in a small sauté pan over low heat. Add the almonds and sauté to brown them a little, about 1 minute. Remove and set aside.
Raise the heat to medium, add 2 more tablespoons oil and add bread to the pan. Cook until the bread turns a nice brown color, around 30 seconds on each side. Remove and set aside.
Add the pureed chilies to the pan, and cook for 30 seconds. Remove from heat.
When vegetables are cool enough to handle, peel them. Seed the pepper and tomatoes and discard the stems. Place the roasted vegetables in a blender or food processor along with the almonds, bread, softened chilies, vinegar, pimenton and the remaining 2 tablespoons of oil. Blend till the mixture forms a thick sauce, and add salt to taste.
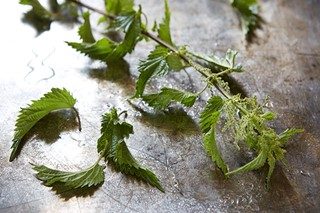
STINGING NETTLES
Despite the sting of their prickly leaves, stinging nettles are secretly both good tasting and good for you. The sting comes from formic acid in the hairy leaves, which is neutralized when cooked. Nettles are greens with amazing culinary and medicinal properties. They are high in iron, potassium, manganese, calcium and Vitamins A and C (and are also a decent source of protein).
The word “nettle” describes more than 40 different flowering plant species from the Urtica genus, which comes from the Latin word “uro,” meaning, “I burn.” The plant is native to Europe, Asia, Africa and North America, and is found wild throughout the continental United States. Nettles are readily available in spring and early summer.
Nettles are additionally used as a medicinal herb and reportedly can help in treating arthritis, anemia, hay fever and kidney problems, among other ailments. Dried leaves may be used to make a tea that is useful in alleviating allergy symptoms.
Look for young plants in spring and summer when you are ready to forage. Pick the leaves while wearing thick gloves and a long-sleeved shirt (and pants). When foraging, only pick the nettle tops (the top four leaves) and make sure the nettles are less than knee-high. Nettles are found in woodsy areas and forests, in natural grasslands, along fertile fields and riverbanks, and along shaded trails.
To cook nettles, wash and drain, discarding the stems. Place the leaves in a pot of boiling salted water and cook for 1 to 2 minutes until nettles are wilted. Drain through a colander and press out any excess water. Nettles can be stored in an airtight container in the refrigerator for up to 5 days. Again, after cooking, nettles produce an entirely sting-free eating experience.
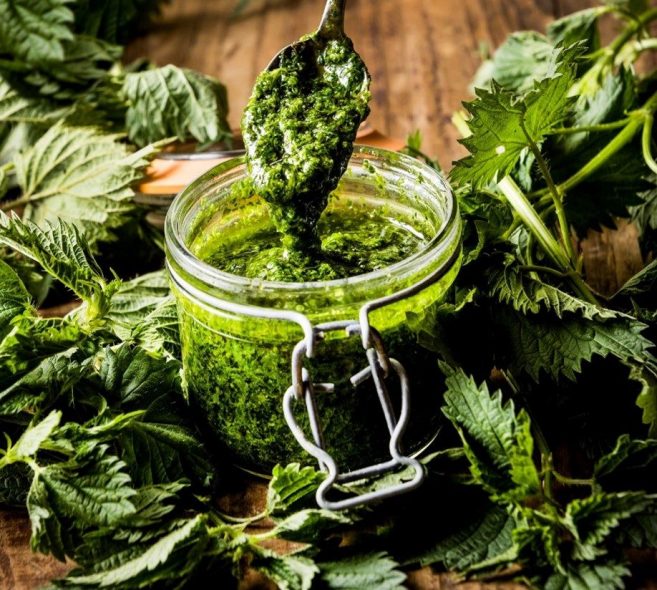
Nettle Pesto
Makes 1-1/2 cups
Delicious with pasta, but also try adding nettles as a garnish for creamy soups, and fold into softened butter for a delicious topping for meats, fishes and vegetables.
5 cups or so uncooked nettles leaves and small stems
3 cloves garlic
4 tablespoons pine nuts or blanched almonds, lightly toasted
1/2 cup extra-virgin olive oil, plus more as needed
1/2 cup or so freshly grated Parmesan cheese
2 teaspoons finely grated lemon zest
Salt and pepper to taste
With tongs, place the nettles and garlic in a big pot of salted, boiling water for 1 to 2 minutes. Drain and immediately plunge into cold water to stop the cooking and to set the color. Drain again and wring dry in a clean tea towel. Coarsely chop both the nettles and garlic. You should have 1-1/4 cups or so.
In a food processor or blender, combine the nettles, garlic, pine nuts, olive oil, cheese and zest. Process in bursts to chop coarsely until a thick green sauce forms. The mixture can be as smooth or textured as you prefer. If the sauce is too thick, add a little more olive oil. Season to your taste with salt and pepper.
Pour into a glass jar or other container and top with a thin layer of olive oil to prevent the surface from discoloring. Cover tightly and refrigerate for up to 1 week or frozen for up to 3 months.
John Ash © 2025